
In Part 1 of Framing on a Small Budget, I shared with you where I got my frames and how I prepared them for my artwork. With Part 2 of Framing on a Small Budget, I’ll share with you how I assembled the frames and finished them in preparation for hanging. Having worked in a professional frame shop before, I know some of the steps aren’t strictly how the pros would do it, but this is the solution I came up with on my small budget. In the end it all worked out fine and the finished product looks very nice, if I do say so myself!
When you’re framing a piece of art, you intend for it to last a long time. A key element to the longevity of a framed piece of art is using archival materials where ever possible – especially those materials that come in direct contact with the artwork itself (such as the mat board and materials for attaching the photo to the mat board). This is not the area to skimp in your spending, but it also doesn’t mean you have to break the bank, so shop around for your best deal. Archival products should say somewhere on the packaging “acid-free”, “PH Neutral”, or even “photo safe”. I’m not going to go into how to mat the artwork in this post. I happen to have my own mat cutter and do it all myself, but I know many people simply buy pre-cut mats. There is enough info that goes into this topic alone to fill an entire blog post, so if you’re interested in a matting how-to let me know and I’ll do it!
So, weather you pop your art into a pre-cut mat or do the mat cutting yourself, we’ll pick up at the point of securing your matted piece into the prepared frame. Make sure you have clean hands or wear cotton gloves when handling the artwork – oils, dirt, and other contaminants can discolor the print and/or matting over time. Also, make sure the glass in the frame is clean and dry. Take your time at this step to make sure every speck of dust is removed from between the glass and the matted artwork. It’s a pain to have to redo your finishing after discovering dust trapped inside the frame!

 Once you have the art and glass cleanly in the frame, turn it over so that the back is facing up. You may want to add another piece of mat board or something to fill the extra space and give the artwork a bit of “padding” on the back. You could even use cardboard cut down to size for this. At this point, a pro framer would use a handy brad gun to insert small flat “pegs” (a.k.a., brads or points) spaced out along the inside edge, just above the matted piece and backing. Since I didn’t have the tool to make inserting brads a simple process, I opted to use heavy duty, acid-free white masking tape to secure the matted piece in the frame along the entire length of each side. The tape was easy to use and made securing the matted artwork in the frame a fairly quick process. I found the tape on sale at an art supply store for about $8/roll.
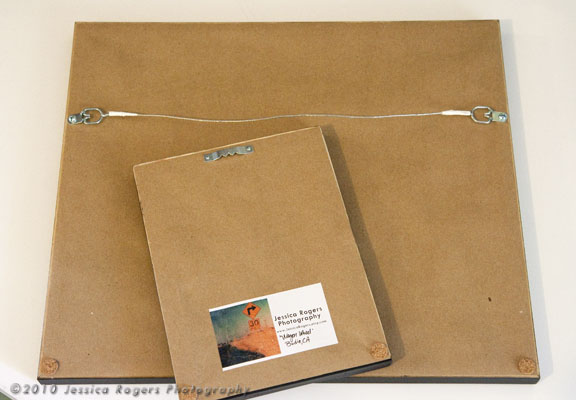
To give the back a clean finished look, I then covered the entire back with some heavy brown paper. I believe I found it with the shipping supplies of an office supply store (though I bought it several months ago for another project, so I don’t really remember). This is where the preparations made to the frame really pay off – a cleaner edge makes for a cleaner finish!
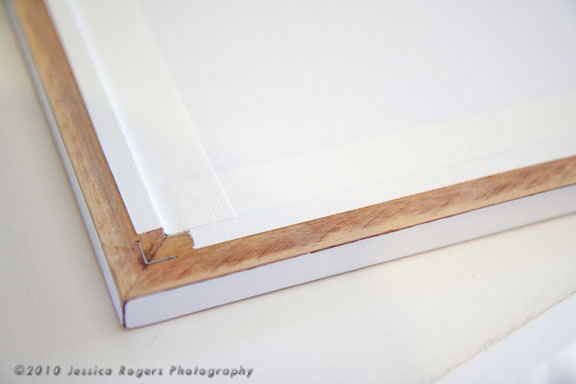
To adhere the paper to the frame, use a narrow double-sided adhesive all along the edge of the back. I found one at a local office supply store that came in a dispenser to make application easier. It was a few dollars more, but I decided it was worth it for a bit of convenience. To get a nice clean edge all around, apply a piece of paper backing that’s a bit larger than you need. Take care to apply the paper so that you don’t have a lot of slack or wrinkles. Once securely attached, crease the paper to show where the outer edges of the frame are. Take a straight edge and an exacto knife to trim the excess paper about 1/8″ inside the outer edge of the frame on all sides.

Now you’re ready to attach your hanging hardware. There are two basic types of hanging hardware you could use: a wire, or saw-toothed hanger. All these materials can be found at your local hardware store fairly inexpensively. The type you need to use will be determined by the frame. For larger or heavy frames, I’d go with the wire. For smaller, lighter, or very narrow frames, use the saw-toothed hanger. The saw-toothed hanger is the easiest to attach. Find the top edge of the frame and lightly crease the backing paper just enough so you can see the width of the frame. Measure with a ruler and mark the very center of the frame. Center the saw-toothed hanger over the mark you just made. At this point, I just held it in place with one hand while I carefully made the pilot holes for the nails with my drill. You could also tape it in place with painters tape (so it won’t tear the paper), while you hammer the nails in place. If you find it hard to hold the small nails, use needle nose pliers to hold the nail in place.
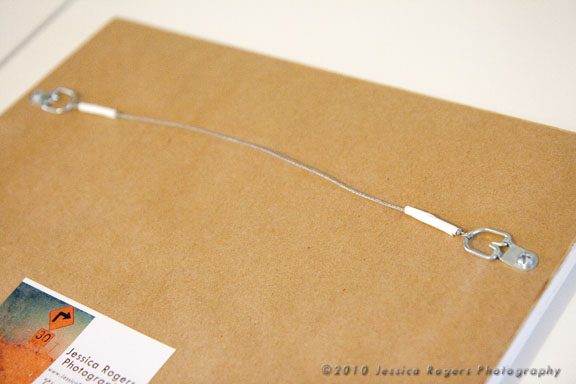
Wiring a framed piece doesn’t need to be difficult either – it just takes a little practice. First you need to mark where the eye screws or “strap rings” (the piece you actually put the wire through) will go. I prefer the strap rings (as shown in the image here) to the eye screw – they lay more flush to the frame allowing the frame to lay closer to the wall, but either will work. Lightly crease the paper, as you did with the saw-toothed hanger, but this time it will be about 1/3 of the way down from the top on either side. Measure and mark each side where you will place the strap ring or eye screw. Make sure your marks are the same distance from the top of the frame on each side and roughly centered in the width of the frame. Drill a pilot hole at the marks, making sure you don’t go too far through. Some frames have varying thicknesses, so be aware of the thickness of your frame! Make sure your screws won’t be too long either. Screw in the strap rings (or eye screws) tightly. To attach the wire, start by threading the loose end of the wire through one strap ring, wrap the wire back on itself as tight as you can. Make sure you’ve pulled enough wire through to wrap back on itself for about 3/4″-1″. Then, stretch the wire somewhat tightly across the frame and cut the wire 2″-3″ beyond the opposite edge of the frame. Basically, you want to make sure the wire will be long enough to easily wrap the other end, but not so long that your wire will show above the frame. (I like to wire my frames with very little slack so that they also lay closer to the wall when hung.) Thread the newly cut end through the other strap ring and wrap tightly, like you did with the first end. If I’m not using coated framing wire, I like to finish the wrapped wire with a bit of tape to cover the sharp ends.
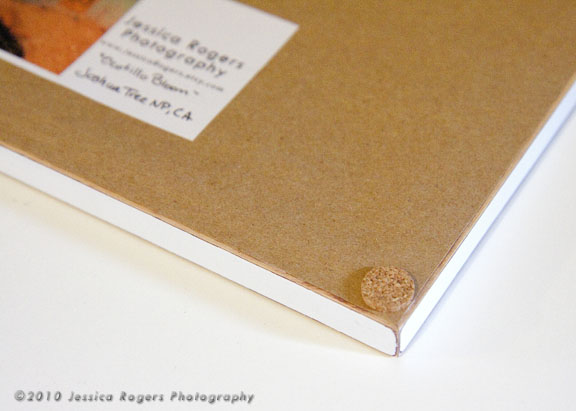
The finishing touches are to add corner bumpers to the bottom corners and a label. The bumpers can be found at your local hardware store in the same section as you found the hanging hardware. I’ve used clear plastic ones in the past, but found these cork bumpers this time and they turned out to be a little cheaper. Bumpers are a nice touch to insure the frame won’t scratch the wall and even aid in keeping the frame from swinging off-kilter a bit. You can also see in the last image here, I’ve added my label to the back. My labels were extra stickers I had printed up for another purpose that simply had my business name and website. I just wrote the title and location of each photograph on these and they added a nice professional finishing touch. You could easily make your own labels with your home printer and a sheet of blank return address labels.
In the 3rd and final post in this series of Framing on a Small Budget, I’ll show you the entire finished collection hanging in the local store they’re going to. If you have any questions about the framing process I’ve discussed in this series so far, please share them with me and I’ll do my best to answer them.
This is so helpful – thank you!
these look so freaking professional!! i will definitely be keeping all this in mind next time i frame :)
Thanks ladies! And don't be afraid to contact me if you have questions when the time comes to do this yourself. ;)
As a framer myself i would say great job on the lessons. People can also use glasier points to keep their artwork in place. And wire is one of the best ways to hang your art work. Great job!!
Thanks so much Rachel! :)