
If you’ve got the space, don’t be afraid to fill up that wall with art!
Last time I showed you how size matters by familiarizing you with some standard matted print sizes and how they each look in the same space. More often than not, a bigger print is going to look more balanced in a space. We also saw how two larger prints can help make a space feel even more balanced and cozy. But that’s not the only way to fill up your walls with your favorite photographs – not by a long shot! Let’s say you’ve been building a collection of prints, which you’ve hung here and there as you’ve acquired them, but now you want to display them all together. Ahh, but where to start?
I know hanging multiple pieces can be a bit daunting. I have had to tackle hanging my work for shows in various places and it can be a challenge to fill a big, empty wall in a balanced manner that helps show each piece at it’s best. But it can also be a lot of fun! Once you understand a few basic guidelines you’ll begin to see all kinds of possible arrangements for your treasured pieces of art. Here are a few things to consider when arranging multiple pieces together on a wall:
- Hang pieces so that the middle (of the individual piece or whole group) is roughly 5′ – 5’6″ from the floor (average eye-level)
- Odd numbers look more pleasing (and are easier to arrange!)
- Use a grid-like layout with multiple pieces for a more formal feel
- Group several pieces in triangular arrangements for a more informal, collage-like feel
- Break down large collections into smaller groups of odd numbers – arrange by moving the groups
- If you have an even number, try arranging the group in balanced pairs
I’ve put together some examples so you can see how these tips might look in action. Lets take a look at a basic group of 3:
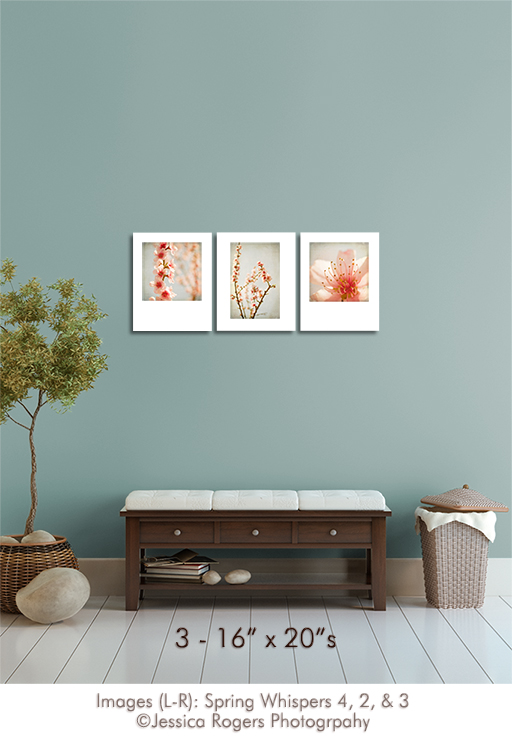
In the example above, all three pieces are vertical and the same size. The arrangement is pretty straightforward with so many similarities. All you’d have to decide is which order you like them in best. For me, I feel it makes a more balanced arrangement to put the two square-format pieces on either end. Here’s another set of 3:

The example above is just a bit more complex, with one vertical and two horizontal pieces. A great way to balance the three is to have the long side of the vertical piece be the same (or as close as possible) as the short side of the horizontal pieces – in this case they are nice and even with a 16″x20″ in between two 20″x24″s. If you don’t have all three pieces the same height, the next best thing would be to have the two outside pieces just a bit smaller.
From the first two examples, you can see that small groups of odd numbers are pleasing to look at and are fairly easy to arrange. What if there are 4 pieces you love together and just can’t narrow it down to 3? No problem! Keep in mind it can be one of the more tricky numbers to arrange, but certainly not impossible. If you have a long wall, say in a hallway, you could line them up following the guidelines in the examples above. But that’s not all you’re limited to, so here’s one possible way to arrange four pieces in a smaller space:
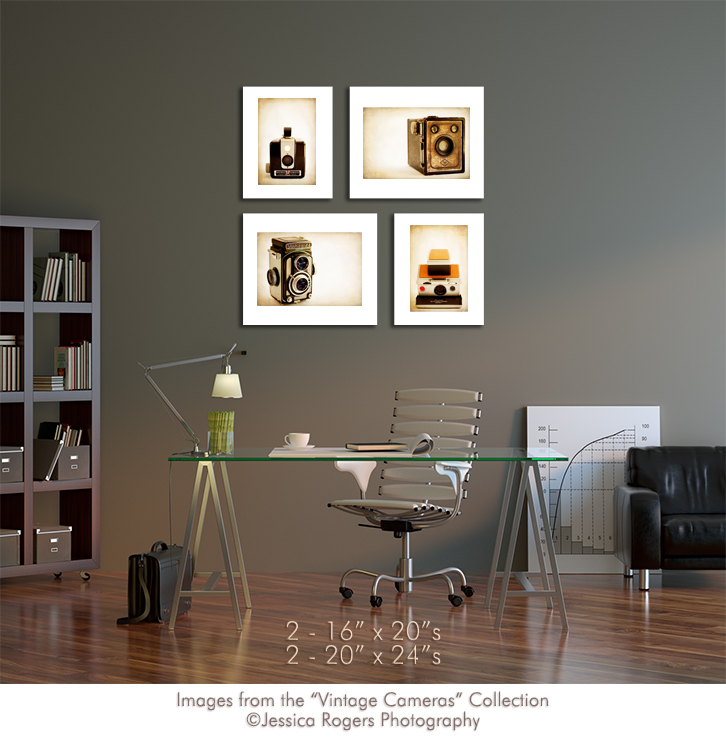
In the example above, it’s a big help having the height of the vertical pieces match the height of the horizontal pieces. By pairing a vertical with a horizontal and spacing everything evenly, I was able to work all four pieces into an overall square arrangement. Now let’s look at a larger collection of images:
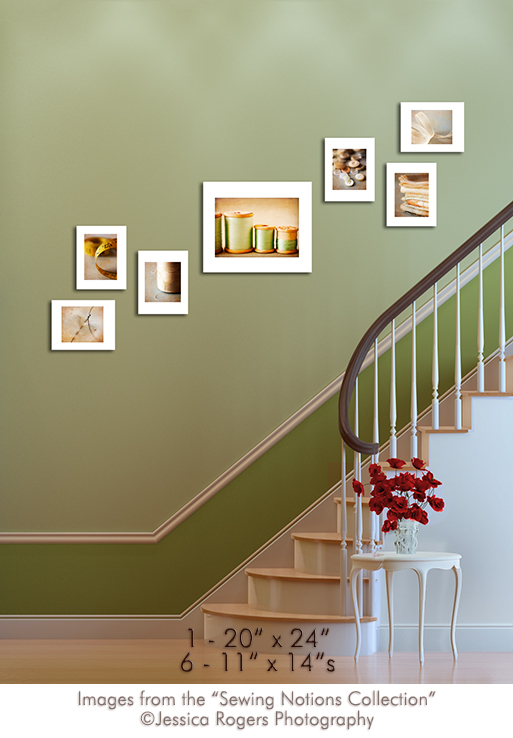
In the example above, we have a nice mix of sizes along with both verticals and horizontals. Start by picking the focal point of the grouping – in this case the largest print was the obvious choice, but if your pieces are all the same size you would pick your favorite or the most eye-catching piece for the center. That leaves 6 pieces to arrange – an even number that easily breaks down into two groups of 3, each group having the same number of horizontals and verticals. Now it’s simply a matter of arranging those two smaller groups on either side of the large print. With more informal, clustered arrangements, try to arrange groups of 3 so that if you drew a line connecting the center point of each you would make a triangle. I also try to taper larger groups from tallest in the middle to shortest on the outside edges.
The last example is definitely more complicated to figure out, but if you take your time and break it down into smaller groups it becomes much more manageable. Here are a few more tips to help you along the way:
- Spacing: give your pieces some breathing room – at least 2″-3″ between each, but don’t space them too far apart or the grouping will be lost
- Gather collections with a common theme: color, subject, or composition for example
- Sketch out or practice the arrangement of large collections on a table or on the floor before putting any holes in the wall
- With larger groups, work from the center to the outside, and have one side of the arrangement be the mirror image of the other
Arranging artwork on walls has endless possibilities with so many different variables between the space in which it will hang and the size and number of pieces to arrange. And there is one other big factor to keep in mind when hanging your art: framing. In the next segment of this series I’ll share with you my thoughts on the importance and impact that matting and framing has.
Check Out Part 1: Size Matters
Prints of the images in example 1 can be found in my Flowers Collection
Prints of the images in example 2 can be found in my Napa Valley Collection
Prints of the images in example 3 can be found in my Vintage Cameras Collection
Prints of the images in example 4 can be found in my Sewing Notions Collection
All Images in the above examples are ©Jessica Rogers Photography All Rights Reserved
Wow, thank you, Jessica, for this good advice and the excellent example photographs. My guess is that you have an innate preference for solidity and formality rather than unstable eccentricity, and I would not argue with that aesthetic if I am right. Your “Sewing Notions” photograph is especially pleasing to me. I have long thought that we understand or perceive a lot of art because of “what is near,” because of context. I was overwhelmed in the Uffizi Gallery decades ago because the paintings were crowded together like subway commuters (more appalling than speed dating must be). Last July I was thrilled by the minimalism of the Seattle Art Museum, where individual paintings or objects were so isolated from each other (i.e. from distractions) as to demand attention (and thus to compel an attentiveness that rewards the patient visitor).